
How to Create a New Group:
To create a group go to: School Admin – Groups – Add Group;
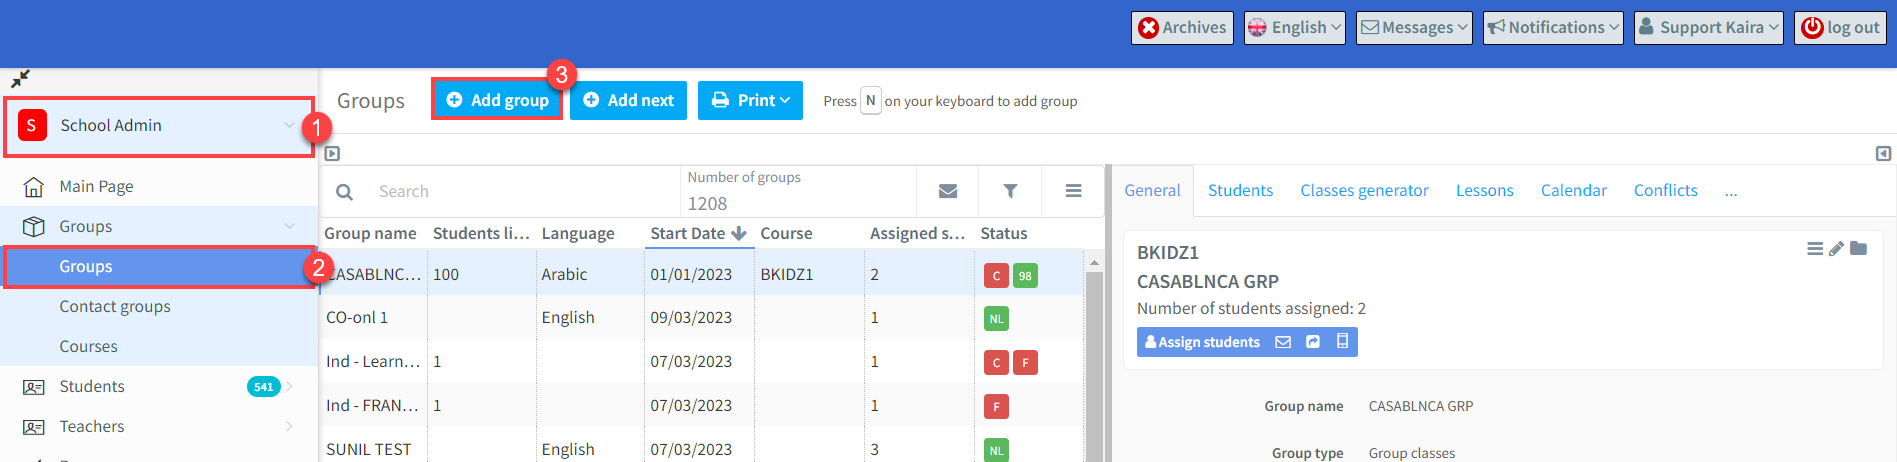
A card will appear, there are a number of fields to be filled in, some are essential, some not. Here are some explanations of terms that will be used.
Basic Information Card:
Here is the first part of the Create Group Card:
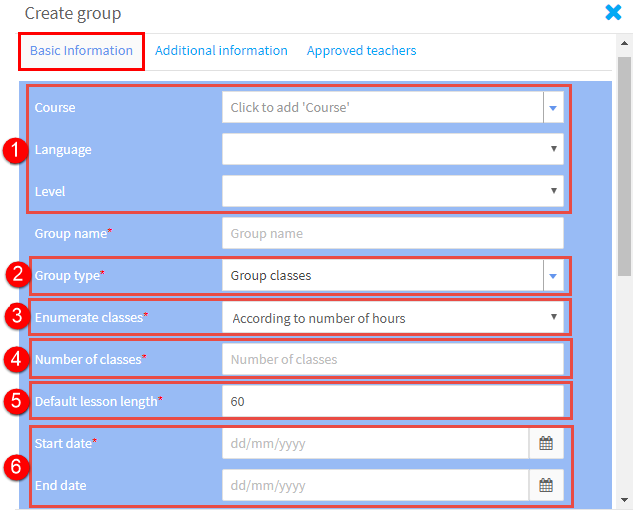
1. Course:
A course is type of lesson i.e. General English, Cambridge Exams, Business English. A group is a subset of a course: Cambridge FCE 1, FCE 2 etc., This is not an essential item in creating a group; but it is a useful way to link groups of a similar type together for statistics, marketing etc., You can find out more about Courses here
Language & Level: These are in Settings – Group Settings.
2. Group type:
This is a way of classifying your groups i.e individual, company etc., These are in Settings – Group Settings .
3. Enumerate Classes:
This tells the system the type of classes that the group will have, types are:
- According to the number of hours. All you need to do is say how many hours this group is to last for. Give the system the start date and it will schedule the exact number of hours planned allowing for holidays etc., If you cancel a lesson, the system will ask you if you want it rescheduled to bring the number of hours back to what was planned.
- According to Due Date. Here you need to give a start and finish date for the lessons. The system will not create make up lessons for bank holidays etc.,
- According to the number of lessons. Similar to the first option but you say the number of lessons from the start date and the system will do the rest.
4. Number of Classes:
This option will appear if you have selected the number of hours or number of lessons option in 3 above.
5. Default Lesson Length:
This is controlled in Settings – Basic Settings and can be overridden.
6 Start Date & End Date:
Every group needs a Start Date, but only “According to Due Date” groups need an End Date.
Here is the second part of the Create Group Card:
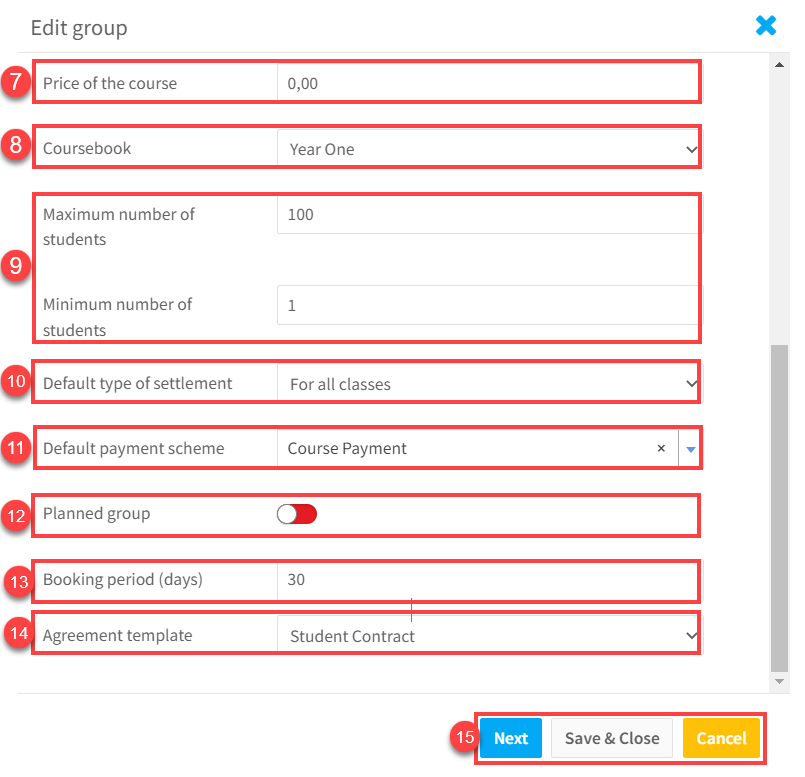
7. Price of the course:
This is needed if you want to invoice for the cost of the course. This is the default price for the course, but every student can have a different price, way of paying and individual discounts. More information is available in the Finance Module.
8. Course Book:
This is controlled in Settings – Group Settings – Course book.
9. Maximum and Minimum Number of Students:
These figures are used to produce reports on availability etc., The system will not allow more than the maximum number of students to join a group.
10. Default Type of Settlement:
There are 3 ways you can invoice students for their lessons.
- For all classes.
- Hourly in arrears.
- Hourly in advance.
More information is available in the Finance Module.
11. Default Payment Scheme:
If you allow your students to pay by instalments, you can choose the instalment plan here. More information is available in Finance Module. To be able to use this feature you must have it activated in System configurations – Group Management.
12. Planned Group:
If you do not want to release details of the group to students and teachers for the moment, mark this green. When you are ready to release details, change back to red. To be able to use this feature you must have it activated in System configurations – Group Management
13.Booking Period:
You may want to allow students to reserve a place in a group, this is the default reservation period and will show on their booking details. Firstly, you will need to have “Spots reserved and awaiting in the group”activated in System configurations – Group Management. The default number of days is controlled from Settings – Group Settings.
14. Agreement Template:
This allows you to automatically attach a contract to each student who is placed in this group. Select the desired contract from the drop-down. Contracts are created in Documents.
15.Create the Group:
When you have entered all the information about the Group, you then click either “Next” or “Save & Close” to create the Group.
- If you click “Next”, then you will be taken to the student card for the Group so you can add students to the Group.
- If you click “Save & Close”, the Group will be created and the card closed, but you can add students later.
After you have created the Group a card will be created. You can find out more about that here.
Additional Information Card:
If there is anything else that you want to record about the group that is not on the Basic Information card, you can create it in Forms and then store it here. You can then filter and search for that field.

Approved Teachers Card:
When adding teachers to groups you can filter by languages, skills etc., but it might happen that a teacher, although they have all the requirements, is not wanted by that group. The approved teacher card allows you to remove the teacher from the selection process.
The card lists all your active teachers. If you untick a teacher, they will not be available for selection.
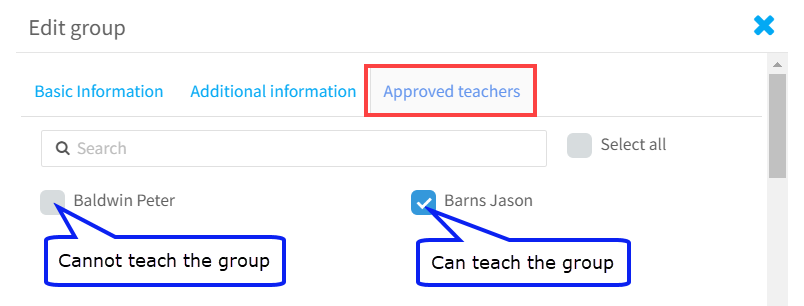
For this feature to work and this card to appear, you will need to have “Show approved teacher card” ticked in Basic Settings.
![]()
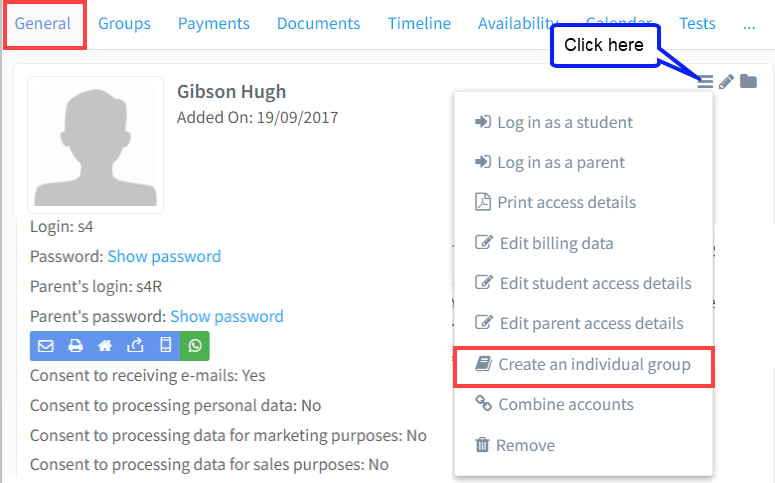
How to Create an Individual Group
You can create a group for an individual student exactly as described above, and then place the student in the group. However, there is a short cut on the Student’s Card; if you click “Create an individual group” it will save a few clicks and assign the student automatically to the group.
How To Create a New Group Using an Old Group
Sometimes groups resume after the summer break and you need to create lessons etc., for the returning group of students for the new school year.
Go to the card of the group you want to copy:
- Click on the 3 line icon.
- Click “Copy and activate.”
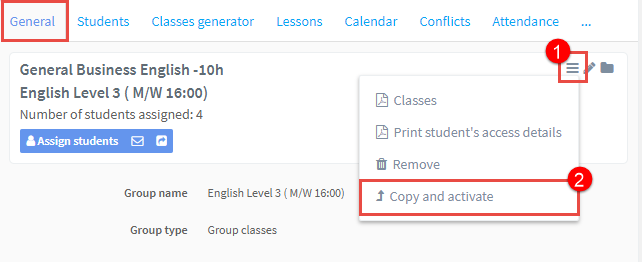
When you click the icon you will be asked how you want to continue

- Copy with generator settings – this option will bring up the Edit Group card so you can change any details: price, dates etc., before creating the new group. The new group is created with the same students, teachers and days and times for lessons – but no lessons. You will need to click Generate Classes to do that.
- Copy without generator settings – this option will bring up the Edit Group card so you can change any details: price, dates etc., before creating the new group but the group will be empty – no students, teacher or days and times for lessons.
You may want to move the original group to the archives after you have created this new group.