
Basic Settings
The pages listed here control the default settings for your school’s SchoolMate account.
General Data:
This top section controls the information displayed on your school’s SchoolMate login page. Most of these details will be completed when we set up your account. The remaining fields are straightforward and allow you to update your school’s basic information as needed.
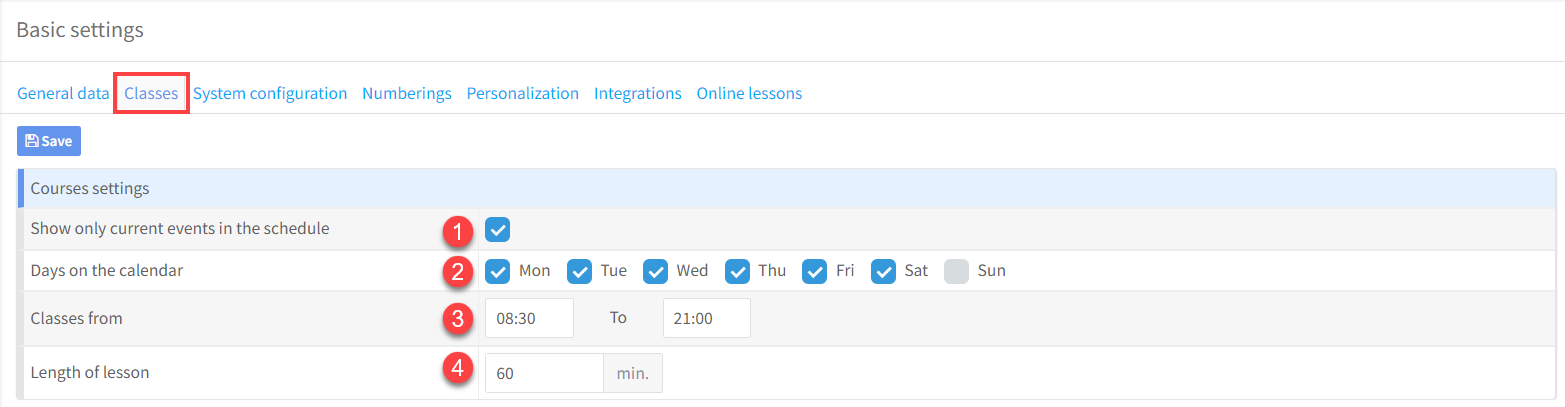
Classes:
These settings help streamline scheduling and ensure consistency across your timetable.
- This controls the items that appear in the Schedule on the dashboard.
- Teaching Days: Select the days of the week your school holds classes.
- Opening Hours: Set the times your school is open each day.
- Default Lesson Length: This is the duration automatically filled in when creating a new group. Enter the lesson length your school uses most often.
System Configuration:
This section customizes how SchoolMate functions based on your school’s operational needs. Most options are self-explanatory, but additional descriptions are provided where clarification may be helpful. Adjust these settings to tailor the system to your workflow.
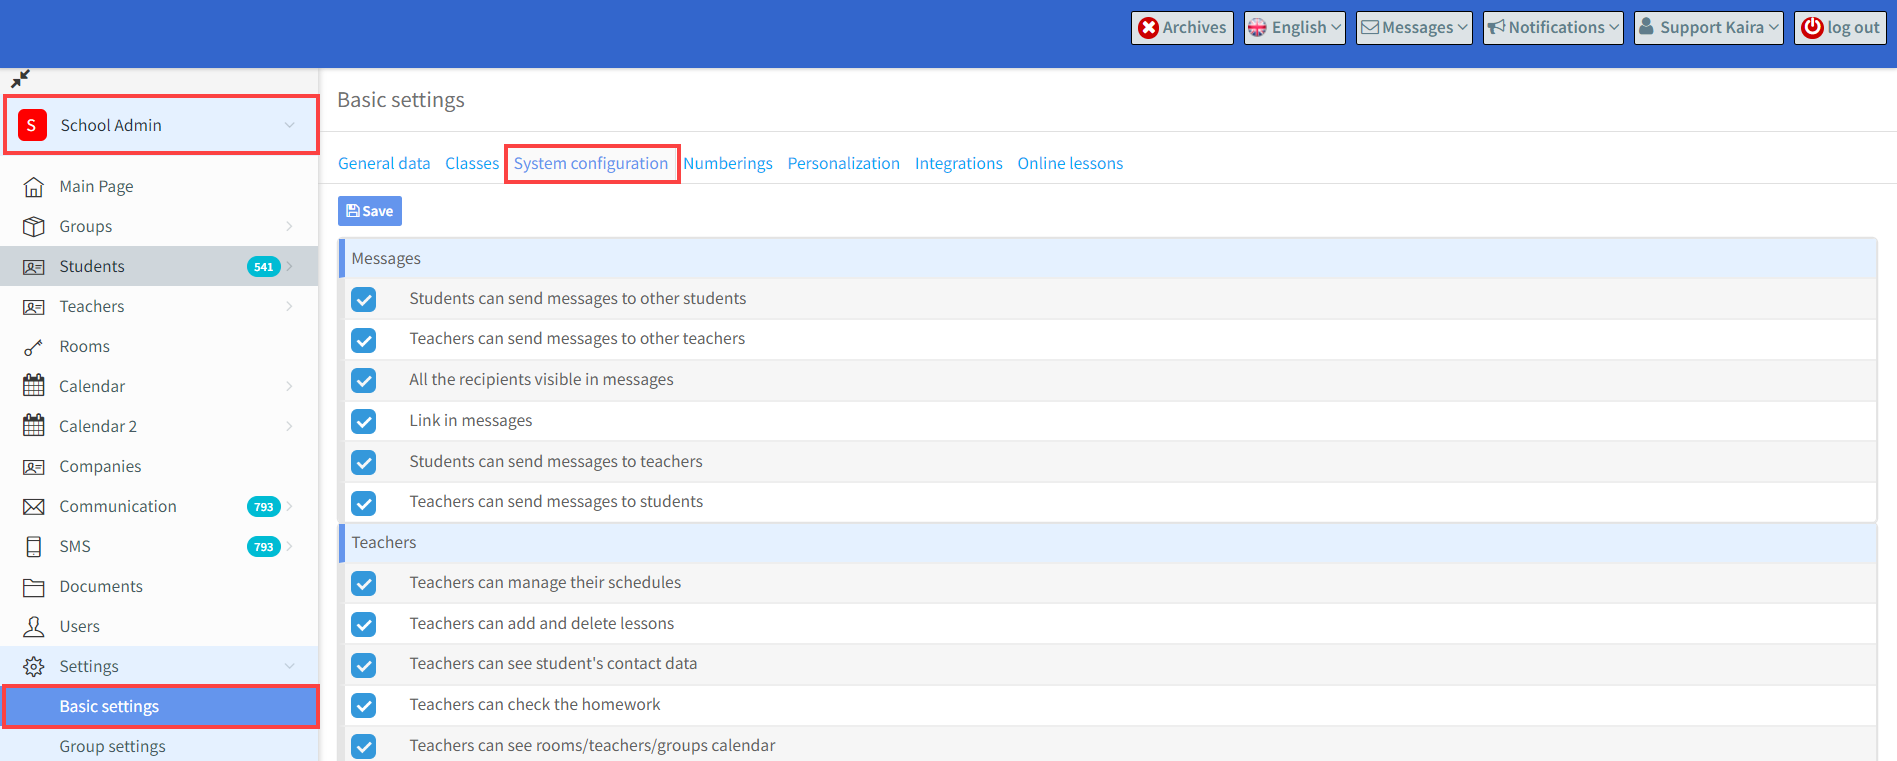
- Messages:
-
- Students can send messages to other students.
- Teachers can send messages to other teachers.
- All recipients visible in messages.
- Link in messages; senders of messages can include a clickable URL link in their system message.
- Students can send messages to teachers.
- Teachers can send messages to students.
- Teachers: – most of these allow teachers to do things when logged into their SchoolMate account. There are user guides for teachers here.
- Show teachers “Show my lessons” – When this option is enabled, teachers will be able to view information entered by other teachers who they share a group with. Deactivating this mean that they will only see their own lessons not the other teacher’s lessons.
- Teachers can send assessment report – When this option is checked, teachers can email a completed assessment report directly to the student after creating it.
- Teachers can manage their schedules – Enables teachers to change the dates and time of classes and set class statuses.
- Teachers can add and delete lessons.
- Teachers can see students’ contact details – emails and phone numbers.
- Teachers can check the homework – with this option enabled, teachers can indicate whether the student has done their homework when completing Class Details.
- Teachers can see rooms/teachers/groups calendar
- Teachers share the grades in groups.
- Teachers can publish and unpublish class details. This activates a button in Class Details to publish the lesson details and share with students in the group.
- Teachers can see classroom location.
- Archived lessons are accounted for in teachers’ settlements – you will be able to calculate the teacher’s wages even if a group is archived.
- Teachers can edit their profile. They will be able to add and edit information about their education, specialisation, qualifications and languages.
- Consolidated students’ list displayed for teachers and companies. This shows a list of students taught by the teacher.
- Teachers can pick the date for each grade – This allows the teacher to manually enter the date the grade was given.
- Group Management:
- Create contact groups. Enables the option to create different contact groups and link teaching groups to them.
- Planned groups option (data invisible for students and teachers). Useful if you do not want to release details of a group and lessons until later.
- Assigning payment scheme to a group. If this is activated, payment schemes can be assigned automatically to all students in a group.
- Spots reserved and awaiting in the group. This created a reservations list. This works in conjunction with another setting here.
- Display form for instalment settings in group. This switches the Generate Instalment feature on or off.
- Possibility to archive classes in groups.
- Room Conflicts in lessons. Many schools use a single classroom to put their online lessons in. This can result in multiple lessons in the same classroom and this creates conflicts. Unticking this box tells the system to ignore classroom conflicts.
- Hide Resources Module. Removes the Resources Module from teachers and students’ menus when they login.
- Confirm the overwriting price of the group student when group price is changed. When you overwrite a student’s existing group price, possibly with a discount, the system will ask you to confirm the action.
- Student:
- Can access student additional information. This allows students to access and update the Additionalinformation card connected to their Student Card.
- Activate parents’ accounts. This allows the creation of parents’ login credentials on the student card.
- Generate students’ logins with consecutive numbers.
- Marking the participant’s contract state (signed/unsigned).
- Display students’ birthdays on the main page.
- Display additional information about students’ levels in their groups.
- Can select the days the student attends classes. If a group has, for example, lessons twice per week and a student is only attending one day per week, then if you click on this button you can deselect the day that the student does not attend.
- Miscellaneous
- Save date for creating subsequent transactions. When you are adding several payments with an identical date retrospectively, this option allows you to remember the date entered in the first transaction edit window and display (save) it when adding subsequent payments.
- Display more information on the rooms/teachers calendar (XLS file).
- Colour customisation on the calendar. You can choose different colours for languages, teachers etc., to make them easier to distinguish on the calendars.
- Display classroom on the classes list.
- Display groups on students list. With this activated you add a “Group” column to the settings of the students’ list.
- Combine student accounts for parental log in. When siblings are taught at your school, it allows you to combine accounts so that the parent can access their children’s records using one login.
- Recalculate student’s rate when hourly payment in advance. The system will recalculate the rate if you change the length of the lesson.
- Generate instalments without rounding.
- Enable time tracking. Some European Union countries require permanent unalterable records of all employees’ hours worked. This feature creates them. There is a tutorial here.
- Activate for Italian Electronic Invoicing. This is a feature that allows schools to upload their invoices in XML format into the Italian government’s accounting system. There is a tutorial here.
- Show approved teacher card. Teachers might be qualified to teach a group, but if the group doesn’t want the teacher, or the teacher doesn’t want to teach the group they can be removed from searches. There is a further explanation here.
- Auto payment for Goods and Services. This will remind you to charge students for certain items: books, registration fees when dealing with their payments. More information here.
- Allow multiple invoice details. This allows schools to have different business identities and issue invoices and documents in different names. These identities are added in Finance – Settings – Issuer Details.
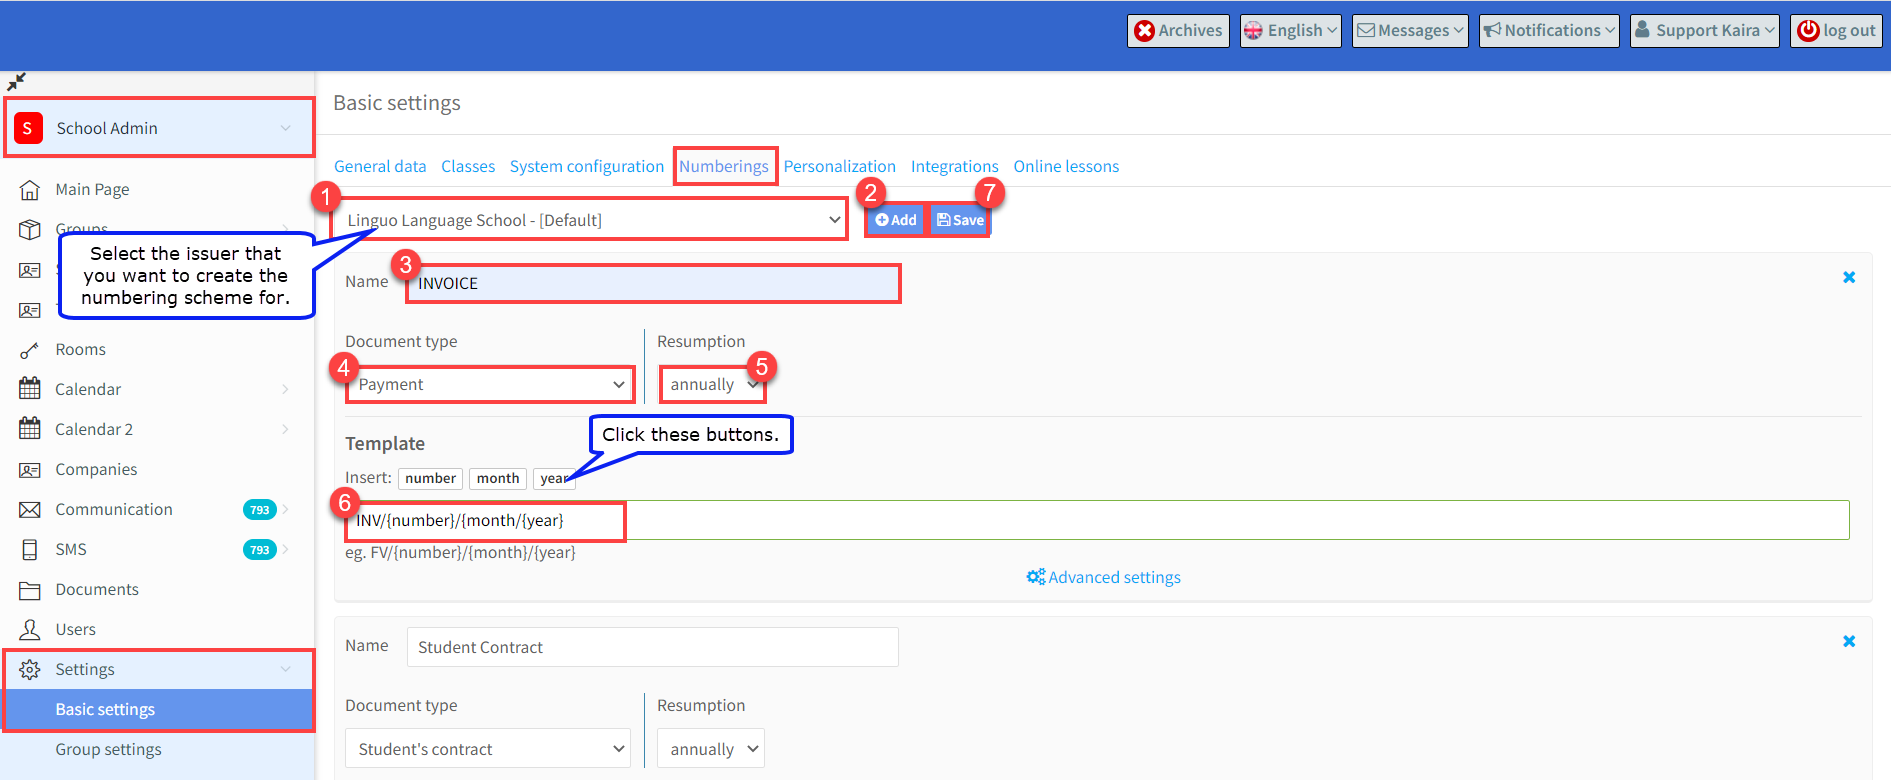
Numberings:
The Numbering Settings allows you to create the numbering schemes you want to apply to your financial documents and contracts. You will not be able to create a document until a numbering scheme has been created for that type of document.
- Some business services provided by schools are subject to tax, while others are not, or must be invoiced through different legal entities. For this reason, schools often operate under multiple financial identities when issuing documents. If you have “Allow multiple invoice details” switched on in Miscellaneous Settings – See 13 above -, you will be able to select the business identity that you wish to add numbering schemes for.
- Click “Add”.
- Give a name to the document for which you are going to create a numbering scheme.
- Select the document type.
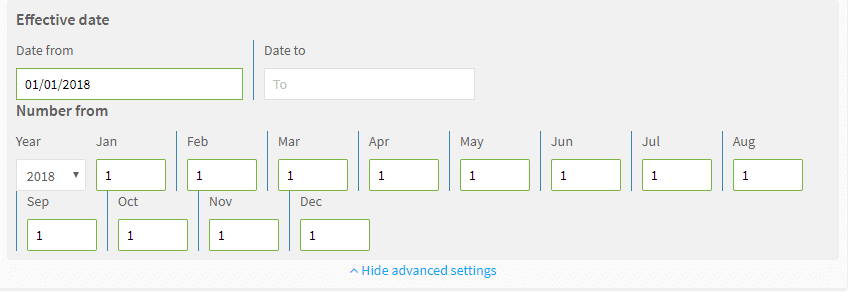
- Select when you would like the document number to restart at 1. ( see Advanced Settings below).
- Create a numbering format for the document . To create the format click on the variables: “number”, “month” and “year”. They will then appear in the template field. You can change the order of the variables by changing the order in which they are clicked. You can separate the variables with backslashes and add a prefix i.e: INV: {number}/{month}/{year}.
- When you have finished click “Save”.
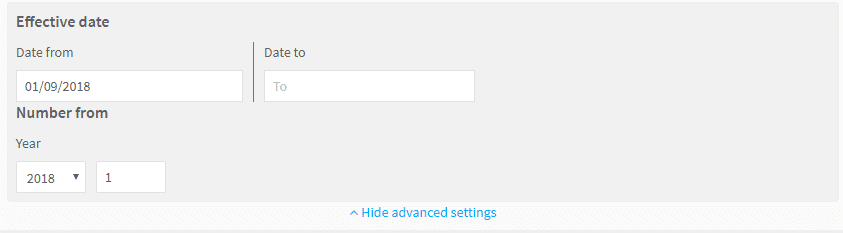
Advanced Settings – in this section we tell the system what to use in the numbering format.
If you selected annually for the Resumption of the number in 5 above, you will see the following:
- Date from – which date will you start using the document.
- Date to – when will you finish using the document. If you leave it blank, it will continue.
- Year – what year should be inserted into the number format. You will need to change this at the year end.
- Number – what number do you want to start issuing documents from. If you are switching over to SchoolMate, you may have existing numbers that you need to follow on from.
If you selected monthly for the Resumption of the number in 5 above, you will see the following:
The principal is the same as outlined in annual resumption.
Personalisation:
- Colours: This allows you to choose the background colours that users see when they login to your school’s account.
- Login: You can place a login button on your school’s web site that people can click on to take them to your SchoolMate login page, this way they will not have to remember the URL for your SchoolMate account. You can decide the colour, size etc., here and then copy and paste the coding into your website.
Integrations:
- HubSpot
Your SchoolMate can be linked using APIs with HubSpot which is an advanced CRM service. You can find out how to integrate your SchoolMate account with your HubSpot account here.
- BinoTel
This is another advanced CRM system that is popular in some countries. You can find out how to integrate your SchoolMate account with our BinoTel account here.
Online lessons:
SchoolMate can be linked with a number of meeting platforms if you hold lessons online. The platforms are Zoom, LearnCube, Google Meets and Microsoft Teams.
First, we will look at the top part of the card:
- Default online lesson provider. You can use any or all of the four platforms in your SchoolMate account. This is the default choice, so put your main platform here.
- The system will send out meeting links as reminders in advance to students and teachers via email. You will need to have your email settings in your SchoolMate account for this to work. There is a tutorial on this here.
- If you have ticked 2, above, this is where you can select how far in advance of the start of lesson the reminder is sent.
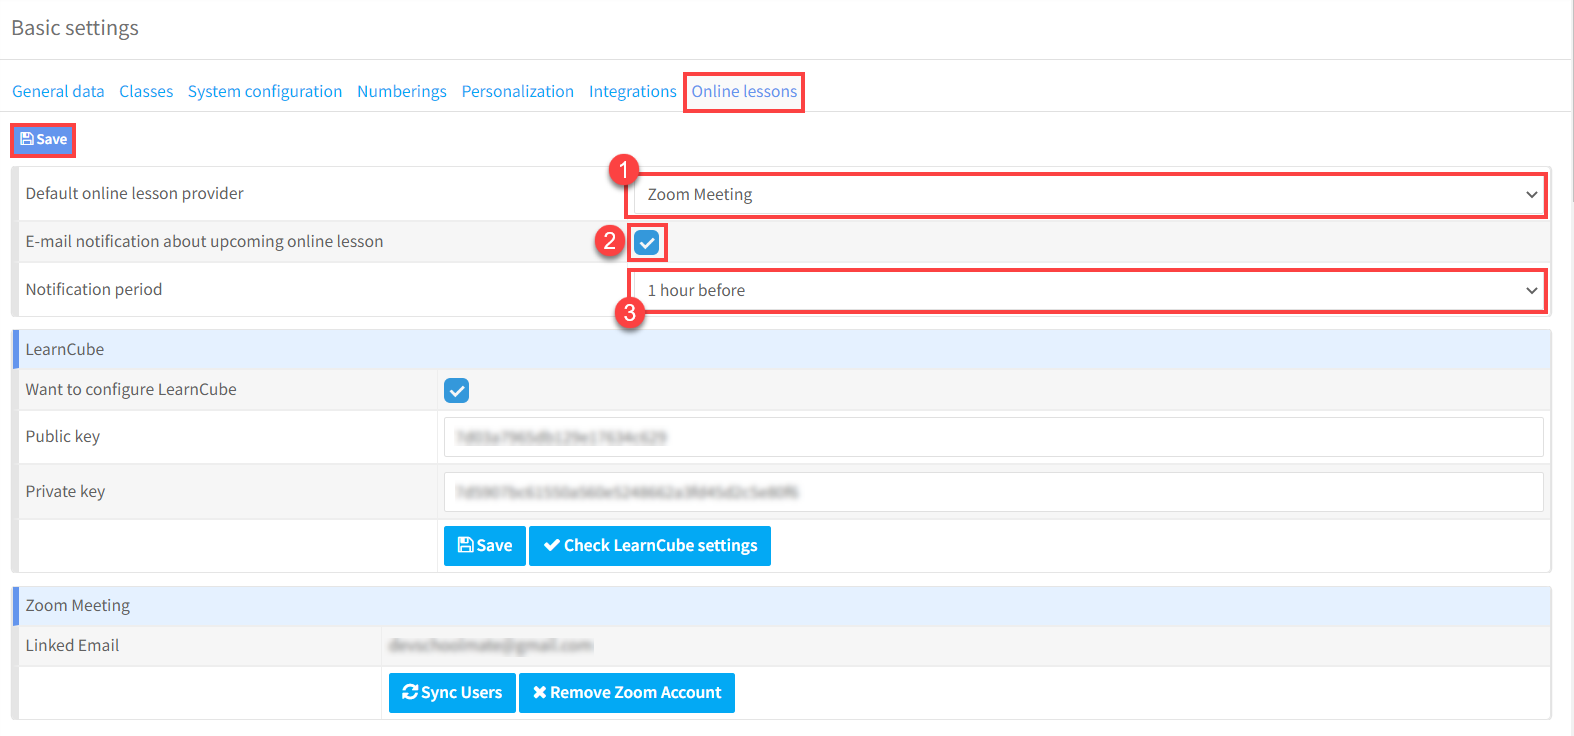
Different Platforms:
With Google Meets and Microsoft Teams you add the meeting link to the online lessons when you are creating them. There is a tutorial on that here.
For LearnCube and Zoom full integration is needed and is added to the lower part of the above card. There are separate tutorials on integrating these platforms.
You can find out how to integrate your SchoolMate account with your LearnCube account here.
You can find out how to integrate your SchoolMate account with your Zoom account here.